Marīcyāsana A, also spelled, Marichyasana A (mar-ee-chee-AHS-anna), translates to the Pose Dedicated to the Sage Maricihi. It is the first of four Marichyasana poses from the Ashtanga Yoga Primary Series.
Marichi means, “Ray of Light,” which is one of the aspects of the sun. This is also the name of a sage, Sage Marichi, who was one of the Seven Rishis of the Vedas.
Click here to watch a step-by-step tutorial video on 4 modifications and the full expression of Marichyasana A
I have written a step-by-step guide for all four of the Marichyasana poses of the Ashtanga Primary Series (Marichyasana B, Marichyasana C and Marichyasana D). Check those out for a deep dive into the intricacies of each posture.
Marichyasana A is the fourteenth pose of the Ashtanga Yoga Primary series, and the ninth seated posture in that series. All four Marichyasana poses (A, B, C, D) build upon each other to prepare you for the ones to come. Marichyasana A & B are forward bends (straight and lotus leg positions) and C & D are rotations or twists (straight leg and lotus leg positions).
Benefits of Marichyasana A:
Marichyasana A stretches your shoulders, back and your chest while extending the spine. The pose also stimulates digestion by compressing the abdominal organs and intestines. This in turn can help to relieve gas and constipation. And like all forward bends, Marichyasana A reduces stress and helps to calm the mind.
This is a wonderful posture but can be a bit of a challenge if you have tightness in your hips or shoulders. There is a lot to think about in the posture, oppositions of force, stretching, engaging, reaching and folding. Let’s take a step by step look at how to do Marichyasana A.
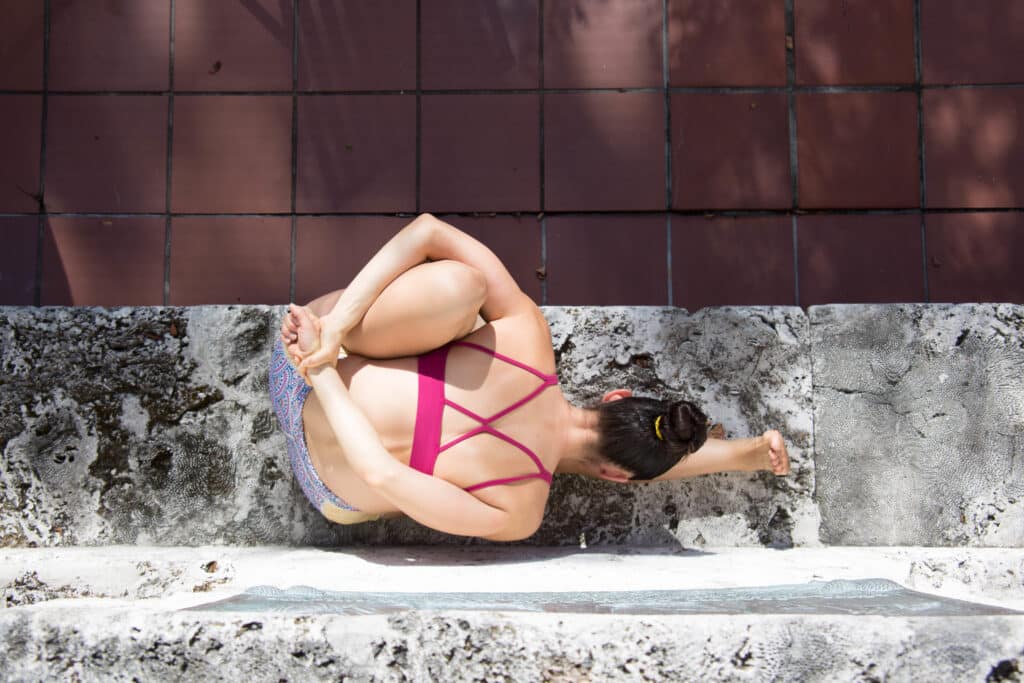
Step-by-Step Instructions for the Full Expression of Marichyasana A: Right Side
- From Dandasana, or Staff Pose, bring in your right foot up and plant it as close to your hip as you can.
- Flex your left foot to engage your entire extended leg.
- Next, extend your right arm forward and reach it around your bent right knee (ensure that your right palm is facing the right and your thumb towards the floor)
- Be sure to bind the arm tight enough that your shin presses into your right armpit so that is very little space between your arm and your knee.
- Reach your left arm behind your back to ‘bind’ your hands together. Be sure to bring the fingers of your hands together, and if possible, grab your wrist.
- With a flat back, begin to extend from your spine to fold forward over your straight left leg.
- Breathe here for five deep breaths.
- Actively engage Mula Banda (root lock) with each inhale, and Uddiyana Banda (abdominal lock) with each exhale.
- With every inhale, focus on lifting up and out of your sits bones to extend your body up. With every exhale, focus on engaging your back muscles to keep the shoulders back. At the same time, hinge from the hips in your forward fold to deepen the posture.
- Throughout the pose, keep pressing your right knee snuggly into your armpit.
- You can rest your forehead on your shin and look towards Nasagrai Drishti (gaze to your nose). Or rest your chin on your shin and look towards Pādayoragre Drishti (gaze to your toes).
- After your fifth deep breath, inhale to lift up off of your shin. Exhale release the bind and take your vinyasa.
- Repeat on your left side.

Tap here to watch a step-by-step tutorial video on 4 modifications and the full expression of Marichyasana A
While the step by step instructions are for getting into the full expression of Marichyasana A, there are several wonderful variations or modifications you can take to start where you are and safely work towards the full expression of the posture.
Marichyasana A Modifications:
Variation 1:
Sit up tall with your right knee bent. Wrap both arms around your bent right knee and stay here. Work to ground your sits bones and lift and lengthen out of your lower back.
The work in this variation is to strengthen and open your lower back so you can get to the point where you can fold forward with a flat back. Excellent modification if your hip flexors are very tight/short. Here you are working with gravity to train your self how to hold your body in space.

Variation 2:
In this variation, you want to start with your left leg extended and your right knee bent up. If your foot is grounded and your knee is pressing towards your right rib cage, reach both arms forward to grab your left shin. For many, the right side body is tight and they are not able to reach as far with the right arm as the left.
If you experience this, it is important to grab the shins tightly with the hands and engage your latissimus dorsi. This allows activation and gravity to help you stretch your body forward (opposition of force/tensegrity). Actively press your chest up, as your pull your hands down. Simultaneously press both sits bones back towards the ground and pressing your right knee towards your ribs.
Be sure to keep your spine long. DO NOT allow your back or your shoulders to round. When done properly, this posture can help relieve chronic lower back pain because it helps to safely lengthen those tight muscles.

Variation 3:
If you are able to bind your hands but unable to fold forward with a flat back, or you cannot keep your shoulders from rounding while you fold forward, try this instead: Get your legs into position with your right knee bent up and left leg actively extended. Wrap your right arm around your right leg and your left arm behind you. Grab your fingers or wrist.
But instead of folding forward, sit up tall for the five breaths and actively work to engage the muscles of your back (rhomboids, trapezius and latissimus dorsi). While doing so, ever so slightly rotating your upper body to the left. In time, you will safely strengthen the muscles of your back and open the muscles of your chest to help you fold forward with a flat back and open chest.
Make sure you DO NOT round your body here. Focus on lengthening your torso to rotate and twist so you get better extension. Keep your breathe steady and bandhas active.

Variation 4:
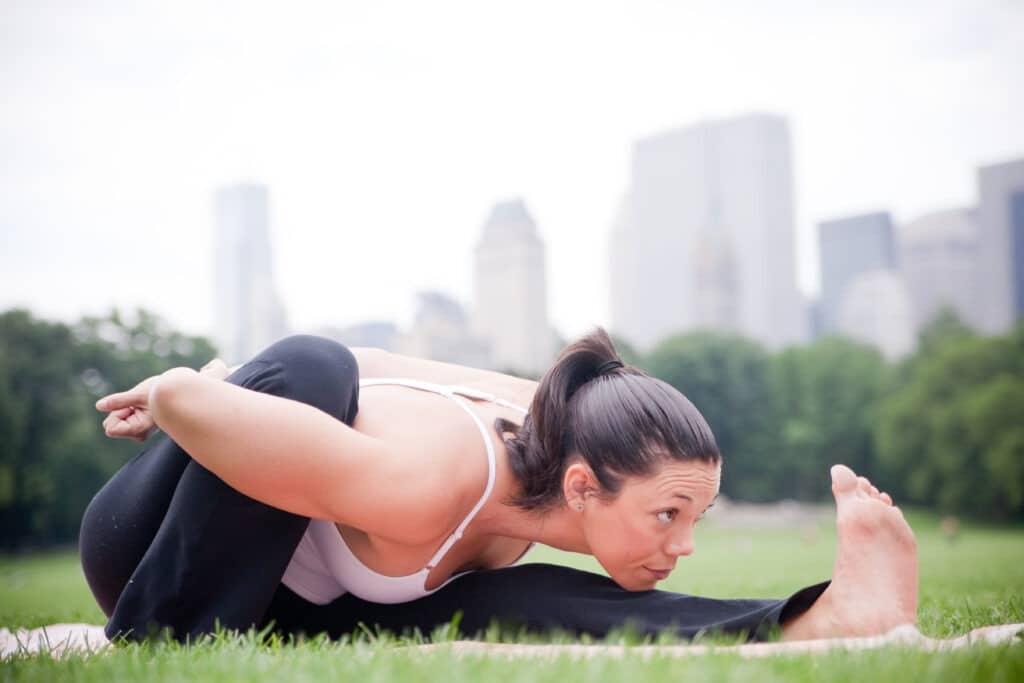
This variation is VERY close to the full expression. Extend your left leg, bend your right knee up, wrap your right arm around your bent right knee and your left arm behind you. Bind your hands. Squeeze your back muscles together and work to externally rotate your shoulders backward as you begin to fold forward, slightly.
Try to lengthen and open your chest. DO NOT round your back or shoulders here. Everything here is about extension. It’s ok if your forehead doesn’t touch your shin or your chin to your shin. If you practice this variation consistently, you’ll soon find yourself in the full expression of Marichyasana A, with a flat back and open chest!

Tap here to watch a step-by-step tutorial video on 4 modifications and the full expression of Marichyasana A
Common Mistakes
It is important that you practice this and every posture mindfully so you get the most out of the posture and ensure you do not hurt yourself.
- Ensure that you leave enough space between the foot of your bent leg and your opposite thigh (about a hand width distance apart). You don’t want your foot to be too close to your opposite inner thigh because it will take you off balance and out of alignment in the posture.
- Moreover, you don’t allow the foot of the bend knee to extend past your hip (too wide). This can put undue pressure on that bent knee.
- Don’t allow your shoulders to round forward. It’s important to maintain integrity in your spine.
- Don’t allow your bent knee to fall or roll to one side and work to keep your torso extended forward in this forward bend.
- If you are not able to bind your arms around your bent leg, do not force yourself into the posture. Start with one of the variations instead and slowly and safely work your way into the full expression of this yoga pose.

No matter what variation of the pose you choose, move slowly through the posture, acknowledge your limits, and respect your bodies limitations.
Why I love this Pose:
It helps you begin to have a greater understanding of body mechanics and the importance of engaging the back of the body to open the front of the body, and vice versa. It’s interesting to see how the body too begins to evolve differently when you begin to gain a greater understanding/awareness of what’s happening in your body as you move through different postures.
Tap below to watch a step-by-step tutorial video on 4 modifications and the full expression of Marichyasana A
Keep Learning
❤️ If you would like to learn yoga with me online, you can do so through my YouTube channel: https://www.youtube.com/@yogawithkrista
Our mission is to help as many people as possible find wholeness in their lives through totally free, high quality yoga videos. We welcome all levels, all people, all bodies, all genders, absolutely everyone! SUBSCRIBE to the channel and join wholeness (Olotita) movement! ❤️

Yoga Tutorial Playlist:
❤️ Yoga is truly accessible to everyone! The hardest part is showing up. Tap here to access the Yoga Tutorial Playlist on Youtube.

About Krista:
I am a level II authorized Ashtanga Yoga teacher and I am passionate about sharing these teachings with all who wish to learn.
If you want to join me in person I teach daily classes at The Yoga Shala in Winter Park, Florida. Additionally, I also offer virtual sessions in Yoga, Meditation, Breath-work, Nutrition, Life Coaching and Mentorship. Check out www.theyogashala.org for more details.
If you do not live in Central Florida and want to find an authorized teacher in your area, check out my teacher, Sharath Jois’ website, for a list of all teachers authorized and certified by his yoga centre in India.
Stay in touch:
❤️Be sure to signup for our newsletter to stay on top of local events and classes, Nysa products sales, new offerings, new products and more! ❤️
❤️We appreciate all your support. If you’d like to donate to our channel: Paypal [email protected]. Please put “donation” in your message. Thank you.
❤️SHOP MERCHANDISE: Nysa Products
❤️CLASSES & PRIVATE INSTRUCTION: If you would like to book your spot for my upcoming group engagements or work privately with me on an individual basis please visit: www.theyogashala.org
❤️SOCIAL MEDIA: You can catch other content by following me on:
Instagram: @kristashirleyyoga
Instagram: @theyogashala_
Facebook: @theyogashala
Facebook: @KristaShirleyYoga
TikTok: @kristashirleyyoga
Twitter: @kristayogini
❤️For other inquires please contact: [email protected]
❤️Thank you for liking, subscribing, and sharing our videos!❤️
❤️ Namaste ❤️